 Typing DOS commands on the Windows Command Line prompt is a most efficient and faster way of doing things in Windows XP. Here's a run-down of the most useful DOS commands available in Windows XP. Some of these DOS commands even do not have an visual alternative.
DOS Command-line tools must be run at the prompt of the Cmd.exe command interpreter. To open Command Prompt, click Start, click Run, type cmd, and then click OK.
ipconfig - Windows IP configuration
Useful for troubleshooting your internet connection. Displays the current IP address of your computer and the DNS server address. If you call your ISP for reporting a bad internet connection, he will probably ask you to run ipconfig.
fc - Free BeyondCompare in XP
FC is an advanced DOS Command that compares two files and displays the differences between them. Though the file comparison results are not as interactive as BeyondCompare or Altova DiffDog, fc is still very useful. You can even set fc to resynchronize the files after finding a mismatch.
type - open text files sans Notepad
Similar to Unix cat command, Type is my favorite DOS command for displaying the contents of a text files without modifying them. When used in combination with more switch, type splits the contents of lengthy text files into multiple pages. Avoid using the type command with binary files or you'll hear alien PC beeps and see some greek characters on your PC.
ping - Say hello to another computer
Ping network command followed by the web-address or IP address tells you about the health of the connection and whether the other party is responding to your handshake request. Ping tool can also be used to convert the web address to a physical IP address.
tree - visual directory structure
You often need to take prints of your physical directory structure but XP has no simple "visual" commands for printing directory contents. Here, try the Tree DOS command and redirect the output to a text file.
tree > mydirectory.txt
print mydirectory.txt
attrib - make hidden files visible
Attrib lets you change attributes of System files and even hidden files. This is great for troubleshooting Windows XP. Say your XP doesn't boot ever since you edited that startup boot.ini file (Hidden), use attrib to remove the Hidden attibute and edit the file using EDIT dos command.
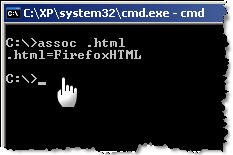
assoc - which program will open that .xyz file
The assoc DOS command can be used to either isplay or even modify the file name extension associations. The command assoc .htm will quickly tell you the name of your default web browser (see picture)
move - more flexible than copy-paste
Say you got a lot of XLS and DOC files in you MyDocuments folder and want to move only those XLS files that have their name ending with 2006. In XP Explorer, you have to manually select each file and then cut-paste to another folder. However, the DOS move command make things much simpler. Just type the following at the command prompt:
move *2006.xls c:\2006Reports\
find - advanced file search with filter
Find is the most powerful DOS command and even more useful than the Windows Desktop Search tool or the Windows Find Wizard. The find command searches for a specific string of text in a file or files. After searching the specified file or files, find displays any lines of text that contain the specified string.
To search your hard disk to find and display the file names on drive C: that contain the string "Google" use the pipe (|) to direct the results of a dir command to find as follows:
dir c:\ /s /b | find "Google"
Quick tip - Drag to avoid typing: When your command acts on a file or folder, you must type the path to that folder after the command. You can save typing time by dragging the file or folder from Windows Explorer into the command window.
To view help at the command-line, at the command prompt, type the following:
CommandName /?
WELCOME TO WORLD'S BEST WINDOWS SNACKS

Saturday, May 31, 2008
Useful Windows XP DOS Commands & Tricks
how to hide a file in a image
1. Gather the file you wish to bind, and the image file, and place them in a folder. For the sake of this demonstration, I will be using C:\New Folder
-The image will hereby be referred to in all examples as fluffy.jpg
-The file will hereby be referred to in all examples as New Text Document.txt
2. Add the file/files you will be injecting into the image into a WinRar .rar or .zip. From here on this will be referred to as (secret.rar)
3. Open command prompt by going to Start > Run > cmd
4. In Command Prompt, navigate to the folder where your two files are by typing
cd location [ex: cd C:\New Folder]
5. Type [copy /b fluffy.jpg + secret.rar fluffy.jpg] (remove the brackets)
Congrats, as far as anyone viewing is concerned, this file looks like a JPEG, acts like a JPEG, and is a JPEG, yet it now contains your file.
In order to view/extract your file, there are two options that you can take
a) Change the file extension from fluffy.jpg to fluffy.rar, then open and your file is there
b) Leave the file extension as is, right click, open with WinRar and your file is there
Cleverly Repair Large Corrupted Files with BitTorrent Client Checksum Hash Scans
I admit, I have a very fast broadband connection at home. My link speed is more than 6 Mbps. You’d think I can’t complain. But there are some files that seem to download for an eternity. Take, for instance, the Windows Vista Beta. On my connection, that 4 GB bloatware *.ISO mammoth took about two hours to download. Even, when I used DownThemAll!, it took about an hour and a half! That is way too much time to spend for downloading.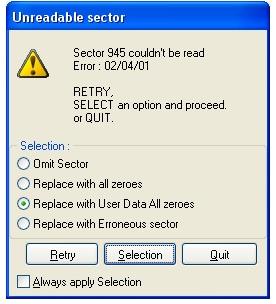 Corrupted *.ISO Image File
When I was writing one of my most recent articles on free T-Mobile Hotspots and Microsoft Windows Beta virtualization, I needed a copy of Windows Vista Beta. I wasn’t exactly looking forward to another 2-hour wait of download time. So, I checked my stack of burned CDs and DVDs for an old copy. To my good luck, I found the original copy of Vista. I just had to rip it to my hard drive for faster virtualization. Unfortunately, there were about 5 unrecoverable disk sector read errors. “Maybe,” I rationalized, “Vista won’t really care if there are just a couple of corrupted data bytes. Besides, I just need it for one small task.” I was wrong. The Windows Vista installation program actually performs a corruption test to make sure everything is set before actually proceeding with the installation.
To think that 4 tiny sectors in the DVD hampered my schemes of exploiting T-Mobile! Would I have to redownload the ISO image online to continue with my plans? No! Fortunately, I found a forum thread from Locker Gnome (bless Chris Pirillo) that helped deal with corrupted Vista ISO image error 80070241 code. The solution was simply ingenious!
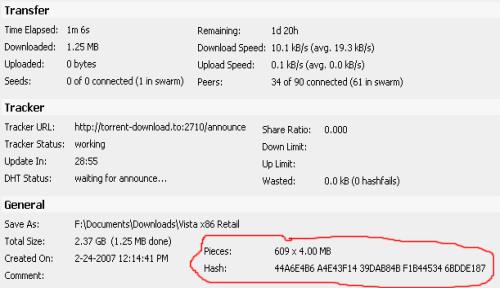
BitTorrent Checksum Hash Scans
To repair large corrupted files, you have to understand how hash scans and torrents work. A *.torrent file contains two important pieces of information, the torrent tracker address and the hash key. The address of the torrent tracker contains all the IP addresses that have pieces of the desired file. The torrent client downloads data segments of the desired file from different IP addresses referred to by the tracker. Depending on the size of the desired file (in my case 4 GB), there can be hundreds of file segments to download. After each segment is downloaded, the torrent client uses the hash key to validate the data so each file segment is exactly the same as the one in the original file. This ensures that any corrupted data, dummy data, or malicious data isn’t mixed into the final product.
Repair Files with the Checksum
This hash check occurs several times in a torrent client but the most important time, in this case, is when the program starts up. Before clients begin to download, upload, or seed a torrent, the programs do a complete hash check of the data already downloaded and available. With large corrupted files, you can take advantage of this hash check.
- Just find a torrent of the exact file in The Pirate Bay, ISOHunt, or TorrentSpy and download it for about a minute.
- Then, stop and close the client.
- Replace the torrent data file with the corrupted file.
- Reopen the client and start the download. The client will perform a hash MD5 check on the current data to see what file segment downloads are necessary. If you correctly found a torrent of the exact file, the client will redownload the segment of the corrupted data and rebuild the file. In the end, you should be good to go!
Cons
There are a couple of caveats for using this method to repair corrupted files.
- It’s kinda shady. Depending on the file, legality of torrenting may be questionable.
- You have to find a torrent of the exact file.
- The torrent tracker must have some IP addresses participating. You may find the torrent of the exact file but that torrent may also be dead.
Leave a comment on your experience with this method or post any other suggestions!
See all rapidshare folders
Use following keywords in google to see all rapidshare folders available on internet
site:rapidshare.com inurl:users "*"
site:rapidshare.de inurl:users "*"
site:rapidshare.com inurl:files "*"
site:rapidshare.de inurl:files "*"
site:rapidshare.com inurl:users (pass|password)
site:rapidshare.de inurl:users (pass|password)
Suppose u need some info on hacking.Then u can try following keywords to see all rapidshare folders having any hacking related thing in it
site:rapidshare.com inurl:users "hack"
site:rapidshare.com inurl:users "hacking
MAKING WINDOWS XP GENUINE THE EASY WAY
download jellybean keyfinder from this website
http://www.magicaljellybean.com/keyfinder.shtml
Now open keyfinder.exe
Click on options and click "change windows key"
Now enter this key and you're done.
*****************************
V2C47-MK7JD-3R89F-D2KXW-VPK3J
*****************************
P.S: this works on windows xp sp2 only......
ppl u can try this out...
this might sound silly but it works perfectly...
TRY INSTALLING IE7 OR MEDIA PLAYER11 or IE8
Dynamically Repeat and Broadcast the Strongest Wireless Networking Signal
“I don’t have Internet access at home.” What a terrible thing to hear! It is so sad when people tell me that the only way they check their email is by visiting public, community-sponsored, unprotected venues like the library. Internet access is almost as essential as utilities. When my sister informed me that she didn’t subscribe to Internet in her apartment complex because it was too expensive, I compared that to having no running water at home. Its like she hasn’t bathed since she moved in!
Taking pity, I set out to solve her dilemma. Luckily, the great thing about living in an apartment complex is that you are usually surrounded by a neighborhood of trusting technology dummies. At least 5 open wireless signals will abound everywhere ... except where you need them the most, in your room. The only place that I could detect a signal was next to the kitchen window. Sadly, it would be too cluttered (and too trashy) to move the computer in the kitchen. However, we could bring the Internet connection to us in the computer room.
"The Little Router That Could" – Tillie on Steroids (Hacked Firmware)
Enter DD-WRT. The release of the Linksys WRT54G Wireless-G Router was a milestone in the computer and networking underworld. When a couple of hackers reverse-engineered the firmware, they were pleasantly surprised to discover that the router was actually running on open-source Linux! With that in mind, a barrage of unofficial router firmware filled the open-source community.
![]() Each variation of the firmware enabled new features, turning the $60 piece of home networking equipment into a very capable network server/router very well worth $600! Options and preferences that you thought were not possible began to appear in the router’s configuration GUI. A couple of talented programmers added functions like antenna power amplification, wireless distribution system, RADIUS server, overclocking, file server, VPN server/client (PPTP, OpenVPN, or SSH), public hotspot portal/gateway, and graphical statistics. Who knew a router with a 200 mhz processor could be such a powerhouse? It's like "The Little Engine that Could."
Each variation of the firmware enabled new features, turning the $60 piece of home networking equipment into a very capable network server/router very well worth $600! Options and preferences that you thought were not possible began to appear in the router’s configuration GUI. A couple of talented programmers added functions like antenna power amplification, wireless distribution system, RADIUS server, overclocking, file server, VPN server/client (PPTP, OpenVPN, or SSH), public hotspot portal/gateway, and graphical statistics. Who knew a router with a 200 mhz processor could be such a powerhouse? It's like "The Little Engine that Could."
DD-WRT is just one of the many alternative firmware available that boasts these features. I use this particular firmware because it is most updated and it commands the most community support.
Virtual Wireless Interfaces
One of those "impossible" features mentioned above was the creation of virtual interfaces. With any normal wireless networking piece of equipment, you have one chipset dedicated to a specific role, either client (managed) or server (AP infrastructure). The advent of customizable, Linux-based firmware enabled one chipset to perform both roles at the same time by creating a virtual chipset (interface). DD-WRT allows up to 16 virtual interfaces!
Why does this even matter? The router can establish communication with another access point while, at the same time, the virtual interface shares that connection with WiFi clients on the same channel but a different SSID. These interfaces can even be customized with different encryption schemes. The host AP might require WEP but when you rebroadcast the signal under a different SSID, you can use WPA TKIP/AES. Essentially, the router becomes a repeater.
AutoAP + DD-WRT = Dynamic Wireless Network Repeater
However, DD-WRT by itself is not the solution to my dead-signal problems. The signal quality of the 5 wireless ESSIDs is very intermittent. Sometimes, one is stronger than the other. I want the strongest one repeated by the router. AutoAP is an optional add-on to the DD-WRT firmware. This script dynamically connects to the strongest network available. Therefore, if one AP suddenly dies on me, AutoAP connects to the strongest one and DD-WRT repeats the signal to the entire apartment! AutoAP allows me to plug in the router, wait a minute for initialization, and voila! I can start surfing the Internet via the repeater's SSID almost immediately!
Install and Setup Instructions for Dynamic Wireless Repeater Scheme
Only one configuration is necessary at the beginning. Generally, the router automates everything after the initial setup. DD-WRT and AutoAP, together, literally enable plug-and-play functionality!
Choose Your Weapon (Router) Carefully
First things first, get the right equipment. There is really no point in trying this if you don’t own a router that is fully compatible with DD-WRT and AutoAP. Although the open-source firmware was initially designed for the Linksys WRT54G(x) series, compatibility extended to other makes and models. See the Supported Devices page on the DD-WRT Wiki site for more details.
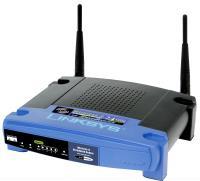 My original router was a WRT54G version 1.1. Sadly, I bricked it last week. So, I had to buy another one. I set my eyes on the Buffalo WHR-G54S ($30 at CircuitCity) since it was the cheapest. I couldn't complain when I discovered that the makers of DD-WRT recommended that particular model the most.
If you decide to go with a different router, get one with a detachable antenna. Nothing is worse than an internal antenna limiting you from achieving better signal range. I mean, you can only increase the antenna power so much until you deteriorate the signal quality, microwave yourself to Leukemia, or plain fry your chipset.
Flash Me!
The next thing you need to do is flash the router with the new firmware. Download the latest cutting-edge version. I used the Version 24 Beta released on 05-10-07. The DD-WRT installation guide can better guide you on flashing the firmware. My only precaution is that if you are doing this for the first time, when the directions say "wait," you wait extra long. It would be completely tragic if you actually performed a successful flash but bricked your router when you reset it during the firmware’s first initialization.
Basic DD-WRT Configuration
- In the "Basic Setup" tab, change the router’s local IP address to an obscure subnet that will definitely not conflict with any other network AutoAP connects to. Try 192.168.176.1 if you can’t think of one. Who uses that?
- Disable the firewall under the "Security Tab."
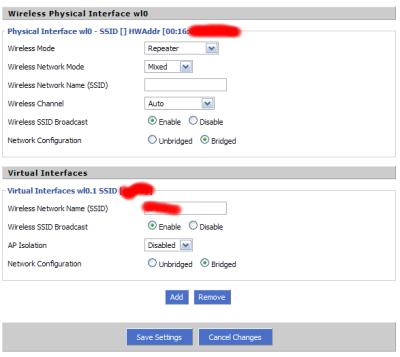
- Next, visit the "Wireless" "Basic Settings" tab. Under "Physical Interface wl0," it should be running in "Repeater" mode on the "Auto" channel and "Bridged" networking configuration. Leave the SSID field blank as AutoAP will later dynamically fill this field as it finds a new network.
- Add a virtual interface. Fill the SSID field with your desired network name. This interface will be the repeater on the network. Make sure "AP Isolation" is disabled and "Network Configuration" is set to "Bridged."
AutoAP Script Installation
Now, its time to install AutoAP! First, you'll need to unprotect your home wireless network so that the DD-WRT router can download the AutoAP script. You will also need the open network to verify and test your setup scheme. Don't worry, it will only be about 15 minutes depending on how quickly you can get this running. One hour tops, I promise. ![]()
Go to the "Command" tab under "Administration." "Save Startup" these commands:
- nvram set wl_ssid=""
- `cd /tmp; until [ 2 = 1 ];do /bin/sleep 30;
- /usr/bin/wget -Oautoap.sh//umn.dl.sourceforge.net/sourceforge/autoap/autoap_test_070219.sh; http:
- chmod 777 ./autoap.sh;./autoap.sh;done` &
When you "Save Startup," you are saving commands that the router will run each time it boots. Basically, on line one, the router will connect to any open wireless network. On lines two and three, the router saves the AutoAP script to a temporary directory. And on line 4, the router installs and runs the script.
The Moment of Truth
Reboot the router and check the AutoAP log (http://RouterIP/user/autoap.htm) after a minute to see if it was installed correctly. If the log appears, try to connect to Google. If that is successful, unplug your Ethernet cable from the DD-WRT router and try connecting to the virtual interface SSID that you specified earlier. Try connecting to Google one more time. If that is successful, congratulations! It works!
Tweaks and Additional Configuration
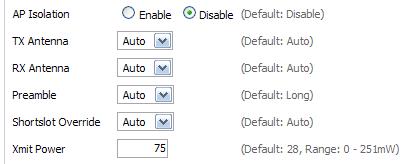
Now, you can resecure your home wireless network and tweak the setup. Optionally, you can visit the "Wireless Security" tab and configure a wireless encryption for your virtual repeater interface. You can also visit "Advanced" settings and increase the "Xmit Power." Try 100 but don’t go beyond 200!
Check the AutoAP Wiki for specifics on advanced configuration. But really, it should work out-of-the-box. Just a helpful tip, I would never "nvram commit." I like the variables easily viewable and changeable. Instead, I save my nvram variables in the "Save Startup" without "nvram commit." I save them with the installation code. This assures that I will always have the latest version of AutoAP. If download of the script is unsuccessful no changes will be made. The router will only retain what AutoAP version is in the memory.
Backup, Backup, Backup
Again, if you've advanced this far, congratulations! It's easy street, all downhill from hereon. There should be no more hassles and headaches. Now, it is only a mater of plug-and-play. Once everything is perfect and your tweaks are lined up in a row, I encourage you to backup your configuration in the "Administration" tab. Who knows? Maybe a freak accident in the future will destroy your hard work.
Closing Remarks
Until the my sister can actually afford her own Internet access, she can just turn on the router in kitchen, wait a minute, and start surfing many rooms away on the premises. The beauty of this setup is that it will work anywhere you go. If you want to extend another wireless signal at school, just do the same thing.
Whether your configuration is successful or not, I highly recommend the wikis and forums on Universal Wireless Repeater and AutoAP. Other than this article, if you have any problems or if you get stuck, these are great references. If anything, feel free to just leave a comment on this post and I'll see if I can help you.
Good Luck!
Increase PC Performance by Reducing Shared Video RAM
I don’t know if it’s just me but I think motherboard manufactures changed the way that they handle integrated video memory. I like to buy a new computer every year. Every year around Black Friday, I buy a system on sale and sell my old one on eBay. I think it’s a pretty good setup. You buy the cutting edge equipment and sell what you have before its features phase out of popularity.
Speed Fetish
I do this because I have an obsession with performance. I like to make sure my computers work efficiently. Unfortunately, most computers out of the box are not optimized for performance. They are manufactured with the dumb does-not-know-any-better home user in mind.
Typical performance-boosting tasks I carry out with every new computer I own include doubling the memory, terminating the system restore “feature,” disabling the swap file, and uninstalling the superfluous, “complimentary,” memory-hogging, thread-wasting programs set up by the computer OEM manufacturer. For those who can empathize with me, I absolutely hate WildTangent.
Marketing Lies
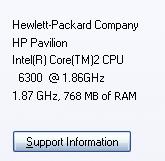 The other day I noticed that my new computer was running slower than normal. Suddenly, I saw that ominous bubble saying something like “You are low on memory. Try increasing page file.” “That’s impossible!” I thought. “I have 1 GB of memory!” But when I checked the System applet, it turned out I had 768 MB of memory. I quickly glanced at the features sticker on the front of my tower to verify that I certainly bought a computer with “1GB Blazing-fast DDR2-5300 RAM.” So, what’s the problem?
Sharing Sucks
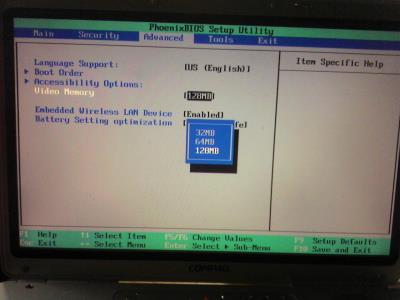
I discovered that the Intel Integrated Graphics Chipset shares the RAM with my motherboard. What gives? That’s fine that it has to share but does it really need to take that much! In my day, we would run fine on 16 MB of VRAM! If you don’t have any high-end graphics requirements like me, why don’t you go into your BIOS and lower that VRAM reservation to the double digits. Your memory-intensive, multitasking, million-tab Firefox windows will thank you.
Creating a desktop shortcut for locking ur compututer
If you use your computer in an area where others may have access to it, and there are things on your system you would rather have kept confidential, locking your desktop when you leave the computer is an essential task. Here's a recipe for a desktop shortcut that will lock your computer in two easy clicks:
Right click on an empty area of the desktop and choose 'new' then 'shortcut.' The create shortcut wizard will open; in the first text box, type '%windir%\System32\rundll32.exe user32.dll,LockWorkStation' and then give your shortcut an appropriate name on the next page, and hit 'finish.'
You will notice that the shortcut you created has a blank icon. To select a more appropriate one, right click on the shortcut and hit 'properties.' In the 'shortcut' tab, click the 'change icon' button.
In the 'look for icons in this file' box, type '%SystemRoot%\system32\SHELL32.dll' then click 'ok' to see a range of icons for your new shortcut. Choose an appropriate icon. Your desktop locking shortcut is now ready for use. Test it out.
Renaming The Recycle Bin icon:
To change the name of the Recycle Bin desktop icon, click Start then goto Run, write Regedit and press Enter. It opens Registry Editor. Now in Registry Editor go to:
HKEY_CLASSES_ROOT/CLSID/{645FF040-5081-101B-9F08-00AA002F954E}
and change the name "Recycle Bin" to whatever you want (don't type any quotes)
Making Google the Default Search Engine in Internet
Open registry editor by going to Start then Run and entering regedit and navigate to following three keys separately and change it as shown below:
[HKEY_CURRENT_USER\Software\Microsoft\Internet Explorer\Main]
"Search Page"=" http://www.google.com"
"Search Bar"=" http://www.google.com/ie"
[HKEY_CURRENT_USER\Software\Microsoft\Internet Explorer\SearchURL]
""=" http://www.google.com/keyword/%s"
[HKEY_LOCAL_MACHINE\SOFTWARE\Microsoft\Internet Explorer\Search]
"SearchAssistant"=" http://www.google.com/ie" .
Customize Logon prompt with your Own Words
Open Registry by going to Start then Run, entering regedit and Navigate to [HKEY_LOCAL_MACHINE\SOFTWARE\Microsoft\Windows NT\CurrentVersion\Winlogon]. In right pane, look for key by the name "LogonPrompt". Set its value to whatever text you want to see displayed at login screen
Disable the Disk performance counter(s)
Windows XP contains a built in performance monitor that is constantly examining various areas of your system. This information can be called up using the performance monitor application found in control panel\administrative tools. Of course, most of us have little interest in this sort of performance statistics monitoring, that being more the territory of systems administrators than individual users.
The thing is, XP is still monitoring away, and some of its observation tools can use a considerable amount of resources. The disk monitoring is an example of this, and it's a good idea to turn the disk monitors off if you are not planning to use the performance monitor application.
To do this: Go to the command prompt ('start\run' then type 'cmd') and type 'diskperf -N'
Alternate Method
Win XP comes with many inbuilt performance monitoring applications that constantly examine various parts of the system. This information can be of real use to a system administrator for collecting performance statistics. However, for a home user, these statistics hold no value and since the monitoring happens all the time, it consumes a good deal of system resources. “Disk monitoring”, for example, happens in the background, and turning it off is advisable if you will not be using the performance monitoring applications. To turn it off, type in “diskperf -N” at a command prompt. To bring up the command prompt: go to Start>Run, type in “cmd” and press [Enter].
Removing Multiple Boot Screens:
If you are getting unwanted multiple boot screen
Then Follow these Steps.
1> Right Click on My Computer
2>Select Properties
3>Select Advanced Tab
4>Select Settings In the Startup & Recovery Section(3rd grp)
5>Select the operating system which u want.
6>And Click OK.
7>Further again press the setting and click on Edit.
8>It will open boot.ini File.
9>Now u can delete those o/s which you don't want to be displayed.
Note: For deleting operating systems from boot.ini file, keep it mind that you can't
delete that o/s which is selected by default there. Before
making any changes make a copy of boot.ini file.
Renaming The Start Button:
To rename the start button, you will need a hex editor.
My preference is UltraEdit
Copy the \windows\explore.exe file to a new name (e.g. explorer_1.exe)
With the hex editor, open that file and go to offset 412b6
You will see the word start with blanks between each letter
Edit it be any 5 characters or less
Save the file
Boot to DOS
Copy the existing c:\windows\explorer.exe to explorer.org
Copy explorer_1.exe to explorer.exe
You will also need to replace the explorer.exe in the c:\windows\system32\dllcache file as well with the new one.
Note: If the partition is NTFS and you can't access the files from DOS:
Start Regedit
Go to HKEY_LOCAL_MACHINE \ SOFTWARE \ Microsoft \ Windows NT \ CurrentVersion \ Winlogon.
Change the value of Shell from Explorer.exe to explorer_1.exe
To convert a FAT partition to NTFS:
Click Start, click Programs, and then click Command Prompt.
In Windows XP, click Start, click Run, type cmd and then click OK.
At the command prompt, type CONVERT [driveletter]: /FS:NTFS.
Convert.exe will attempt to convert the partition to NTFS.
NOTE: Although the chance of corruption or data loss during the conversion from FAT to NTFS is minimal, it is best to perform a full backup of the data on the drive that it is to be converted prior to executing the convert command. It is also recommended to verify the integrity of the backup before proceeding, as well as to run RDISK and update the emergency repair disk (ERD).
Breaking The XP Password:
In case of user password boot the pc in safemode by pressing the F8 key and then selecting the Safe Mode option. You can now logon as an administrator and XP wont prompt for the password. Incase of an administrator account try rebooting the pc in DOS. access C:\Windows\system32\config\sam . Rename SAM as SAM.mj
Now XP wont ask for password next time You Login. Also
Go to the cmd prompt .
Type net user *.
It will list all the users.
Again type net user "administrator" or the name of the administrator "name" *.
e.g.: net user aaaaaa *(where aaaaaa is the name).
It will ask for the password.
Type the password and there you are done.
Logging In As Administrator:
Hold the Ctrl-Alt key and press Del twice. This will bring up the normal login and you can log on as Administrator.
To unhide the Administrator account so it does show up:
Start Regedit
Go to HKEY_LOCAL_MACHINE \ SOFTWARE \ Microsoft \ Windows NT \ CurrentVersion \ Winlogon \ SpecialAccounts \ UserList
Unhide the Administrator key by giving it a value of 1
How to Hide the drives(c:,d:,e:,a:...etc) in My Computer
This is a great trick you can play on your friends. To disable the display of local or networked drives when you click My Computer.
1.Go to start->run.Type regedit.Now go to:
HKEY_CURRENT_USER\Software\Microsoft\Windows\CurrentVersion\Policies\Explorer
Now in the right pane create a new DWORD item and name it NoDrives(it is case sensitive). Now modify it's value and set it to 3FFFFFF (Hexadecimal) .Now restart your computer. So, now when you click on My Computer, no drives will be shown(all gone...). To enable display of drives in My Computer, simply delete this DWORD item that you created.Again restart your computer.You can now see all the drives again. Magic........lol....
Set monitor refresh rate
Every monitor has a maximum refresh rate it is capable of displaying at a given resolution (for example, a typical 17-inch monitor of a few years ago will happily crank out 85Hz or more at a resolution of 800x600, but may only be capable of 60Hz at 1600x1200).
If this refresh rate is exceeded, the image will be distorted and unusable.
Older CRT monitors, especially 15-inch or smaller ones, tend not to be capable of a refresh rate much over 60Hz, especially at resolutions greater than 640X480. Also, setting the refresh rate does not have the same effect on LCD or flat panel monitors, as their screens are not redrawn in the same way.
To change your monitor refresh rate: Right click on an empty space on your desktop (no icons) and select 'properties.' Click the 'settings' tab and choose the 'advanced' button. Now choose the 'adaptor' tab and click the 'show all modes' button.
This presents you with a list of resolution, colour and refresh rate options that your video card\monitor combination is capable of displaying. You can experiment with these settings by using the 'apply' button. Note that a refresh rate of 75Hz or above is generally recommended, (keep in mind most monitors do not support settings higher than 85Hz).
After you set the refresh rate, you may feel a little uncomfortable for a short while as your eyes adjust, but rest assured you will grow to appreciate the difference in ease of viewing.
How to view bootup check disk results
Did you miss the chance to view bootup chkdsk results when your computer rebooted?
- Open Event Viewer
- Windows NT 4.x:
- Select "Start | Programs | Administrative Tools | Event Viewer" from the Start Menu.
- Select "Log | Application" from the main menu.
- Scroll through the events until you see an event with "Autochk" as the "Source".
- Double click on the selected event to view the results of previous bootup check disk operations.
How to create a larger and scrollable DOS box
If you use Windows' "DOS box" (also called "Command Prompt") frequently, you may wish to have a window that has more than 25 to 50 lines. Even if your display isn't large enough to show more lines, you can still have a DOS box that can have much more virtual lines, so that you can scroll up to view the results of a long operation, for example.
- Open a DOS box as usual (for example, select "Programs | DOS box / Command Prompt" from the "Start menu"
- Right click on its title bar and select "Properties..."
- Change to the Layout tab
- Change the Height parameter under Screen Buffer Size group to the number of virtual lines you'd like to have in your DOS box.
- Click "OK"
- Select a way to save the recent changes, if you get a "Apply Properties to Shortcut" or similar prompt.
How fast is your computer, compared to other systems?
Are you wondering what's going on behind the Windows 95 logo while it's booting?
Too lazy to type the full directory name?
Did you know that you can avoid typing full directory names when changing directories from the Command Prompt?
- CD MyNewYorkOfficeFilesFolder
- CD myn*
- MyNewYorkOfficeFilesFolder\AGroup\Outbox
- CD myn*\a*\o*
Fix Win9x/ME Driver Bug
Windows '9x / ME does not install some vxd files in your system directory by default, adding them manually has proven to help for a healthy setup with less crashes. To resolve 20 to 50% of the system errors in any Win9x build, extract these vxd files manually from cab 47 and 48 into c\windows\system\vmm32 and c:\windows\system\ The following files should be extracted: vcomm.vxd, vdmad.vxd, configmg.vxd, vdd.vxd, vmouse.vxd, ntkern.vxd, vflatd.vxd. Extract these files and reboot. Your system will love you for it. Note: In Windows 98SE, the files are located in CABs 53 and 54.
Boost HDD Performance:
Often I hear my friends complaining about slow hard drives. Yesterday one of my classmates asked me how to boost the performance of his new harddrive. I told him about a simple and very easy tweak, that would significantly increase the performance of his hard drive.
Win9x sets DMA to OFF by default. You have to switch it on. In theory, enabling DMA increases UDMA Hard Disk access to 33.3 MB/sec. In practice, speed will increase substantially from the old standard of 16MB/sec. Furthermore, DMA uses only 25% of CPU resources compared to 40% normally. Nearly all 5400rpm/7200rpm, and some lower speed, drives, support DMA.
Now I'll tell you about it. Ready ?
Right-click on "my computer". Now click on "properties". Now search for "devide manager" and click properties of your hard drive. It should have an option called "DMA". By enabling this, your hard drive should show an increase in performance. Also, this method can increase the transfer rate of your CD-ROM or CD-Writer, possibly eliminating those under buffer run errors.
Again, an easy tweak which could improve you hard drive's performance
Get back Bandwidth in XP:
The following tweak applies only to Windows XP Professional edition.
The default system behavior is that all 100% bandwidth is available, however, if there is a running application that indicates to the OS it needs to send high priority/real time data, then as long as it has the socket open, Windows XP will restrict “best effort” traffic to 80% of the bandwidth so that high priority traffic can be accommodated. Basically, applications can make this request to the operating system for QoS support using the QoS application programming interfaces (APIs) in Windows and this only applies if a specific app is requesting QoS.
If you'd like to change how much bandwidth is reserved for QoS (the default is 20% of the total bandwidth), do the following:
1. Make sure you're logged in as "Administrator" (not just any account with admin privileges).
2. Navigate to START>Run and type: gpedit.msc
3. Navigate to Local Computer Policy > Administrative Templates > Network > QOS Packet Scheduler
4. In the right window, double-click the limit reservable bandwidth setting
5. On the setting tab, check the enabled setting.
6. Where it says "Bandwidth limit %", change it to read 0 (or whatever percentage you want to reserve for high priority QoS data)
7. Click OK, close gpedit.msc
Under START > My Computer > My Network Connections > View Network Connections, right-click on your connection and under Properties (where it lists your protocols), make sure QOS Packet Scheduler is enabled.
You need to reboot for changes to take effect.
Remove Dummy programs in Add/Remove Programs in Win2k:
On occasion, you'll find that an application listed in Add/Remove Programs even after you've uninstalled it from your computer. You can remove such applications from Add/Remove Programs by editing your computer's registry. Begin by running Registry Editor and accessing the key "HKEY_LOCAL_MACHINESoftwareMicrosoftWindowsCurrentVersionUninstall".
You'll find keys listed below the Uninstall key that correspond to the applications you see listed in Add/Remove Programs. You remove an application from this list by selecting its key in Registry Editor and then deleting it.
Delete files when the Recycle Bin is hidden
I actually discovered this tip accidentally recently and thought it was appropriate for the Tips page, even though it's probably been a feature of Windows for years. (UPDATE: Sure enough, it's been around for a while. It's still a cool tip and proof that one learns something every day).
By default, the Windows XP Recycle Bin sits at the bottom right of the desktop, just above the tray notification area and system clock. If you've got a bunch of floating windows open, however, it's possible to obscure the Recycle Bin and make it impossible to drag files and folders there for deletion. However, Microsoft must have thought of this event, because you can automatically hide all of those open windows during a drag operation. The first time it happened, I thought it was a fluke. But it's not. Instead, it's a cool hidden feature of XP.
Here's how it works: Make sure a bunch of windows are open on the screen, with at least one of them hiding the Recycle Bin. Then, find a file or group of files you'd like to drag to the Recycle Bin. Pick up the files with the mouse and move them to the lower right of the screen. As you reach the bottom area of the screen, pass the mouse cursor over a blank area of the task bar, hover there for an instant, and--voila!--the open windows all minimize, leaving the Recycle Bin available to accept the dragged files. Good stuff. This tip also works when windows are maximized, assuming the file(s) you want to delete are visible in one of the available windows.
Add/Remove optional features of Windows XP
I first mentioned this technique in an old Technology Showcase for Windows 2000, but it still works in Windows XP, and can be quite useful: For some reason, Microsoft has removed the ability to specify which Windows components you want to install during interactive Setup, and when you go into Add/Remove Windows Components in the Control Panel, you still don't have the full list of applications and applets you can add and remove. Thankfully, this is easy to fix.
To dramatically expand the list of applications you can remove from Windows XP after installation, navigate to C:\WINDOWS\inf (substituting the correct drive letter for your version of Windows) and open the sysoc.inf file. Under Windows XP Professional Edition, this file will resemble the following by default:
[Version] Signature = "$Windows NT$"
DriverVer=06/26/2001,5.1.2505.0
[Components]
NtComponents=ntoc.dll,NtOcSetupProc,,4
WBEM=ocgen.dll,OcEntry,wbemoc.inf,hide,7
Display=desk.cpl,DisplayOcSetupProc,,7
Fax=fxsocm.dll,FaxOcmSetupProc,fxsocm.inf,,7
NetOC=netoc.dll,NetOcSetupProc,netoc.inf,,7
iis=iis.dll,OcEntry,iis.inf,,7
com=comsetup.dll,OcEntry,comnt5.inf,hide,7
dtc=msdtcstp.dll,OcEntry,dtcnt5.inf,hide,7
IndexSrv_System = setupqry.dll,IndexSrv,setupqry.inf,,7
TerminalServer=TsOc.dll, HydraOc, TsOc.inf,hide,2
msmq=msmqocm.dll,MsmqOcm,msmqocm.inf,,6
ims=imsinsnt.dll,OcEntry,ims.inf,,7
fp_extensions=fp40ext.dll,FrontPage4Extensions,fp40ext.inf,,7
AutoUpdate=ocgen.dll,OcEntry,au.inf,hide,7
msmsgs=msgrocm.dll,OcEntry,msmsgs.inf,hide,7
msnexplr=ocmsn.dll,OcEntry,msnmsn.inf,,7
smarttgs=ocgen.dll,OcEntry,msnsl.inf,,7
RootAutoUpdate=ocgen.dll,OcEntry,rootau.inf,,7
Games=ocgen.dll,OcEntry,games.inf,,7
AccessUtil=ocgen.dll,OcEntry,accessor.inf,,7
CommApps=ocgen.dll,OcEntry,communic.inf,HIDE,7
MultiM=ocgen.dll,OcEntry,multimed.inf,HIDE,7
AccessOpt=ocgen.dll,OcEntry,optional.inf,HIDE,7
Pinball=ocgen.dll,OcEntry,pinball.inf,HIDE,7
MSWordPad=ocgen.dll,OcEntry,wordpad.inf,HIDE,7
ZoneGames=zoneoc.dll,ZoneSetupProc,igames.inf,,7
[Global]
WindowTitle=%WindowTitle%
WindowTitle.StandAlone="*"
The entries that include the text hide or HIDE will not show up in Add/Remove Windows Components by default. To fix this, do a global search and replace for ,hide and change each instance of this to , (a comma). Then, save the file, relaunch Add/Remove Windows Components, and tweak the installed applications to your heart's content.

Use the ultimate configuration tool (Professional Edition only)
One of the most full featured Windows XP configuration tools available is hidden right there in your system, but most people don't even know it exists. It's called the Local Group Policy Editor, or gpedit for short. To invoke this editor, select Start and then Run, then type the following:
gpedit.msc
After you hit ENTER, you'll be greeted by gpedit, which lets you modify virtually every feature in Windows XP without having to resort to regedit. Dig around and enjoy!

GPEDIT: It's your best friend for XP configuration.
Use the Windows Sound Scheme
Contributed by Keith Furman
Windows XP ships with a really nice new sound scheme, but it's not loaded by default for some reason. So once you've installed Windows XP, one of the first things you should do is get that new sound scheme loaded.
To do so, open up Control Panel and navigate to Sounds, Speech, and Audio Devices. Then, choose the task titled Change the sound scheme. In the dialog that appears, choose Windows Default for the sound scheme. Windows will ask you whether you want to save the previous scheme, which is usually a brain-dead questions, since no scheme was previously loaded. So choose No, and then click OK to exit the dialog.
Rip high-quality MP3s in Media Player for Windows XP (MPXP)
Contributed by Mark Elder, updated by Paul Thurrott
The relationship between Media Player for Windows XP (MPXP) and the MP3 audio format is widely misunderstood. Basically, MPXP is able to playback MP3 files out of the box, but encoding (or "ripping") CD audio into MP3 format will require an MP3 plug-in. During the Windows XP beta, Microsoft supplied a sample MP3 plug-in for testing purposes, but it was limited to 56 Kbps rips, which is pretty useless, leading some to report that Microsoft was purposefully hobbling MP3 to make its Windows Media Audio (WMA) format look better. This is not the case.
To enable MP3 encoding in Windows XP, you'll need to to purchase one of three MP3 Creation Add-on packs for Windows XP. For more information, please visit the Microsoft Web site.
Start a program using a keyboard shortcut
The Start menu is great for finding programs, but its multiple levels of folders can be time consuming to navigate. If there is a program you start frequently, you should set a keyboard shortcut for it so that you can start the program without taking your hands off the keyboard.
To set a keyboard shortcut to start a program
1. | Click the Start menu, and then click All Programs. Right-click the program that you want to start with a keyboard shortcut, and then click Properties.
|
2. | Click in the Shortcut key box. Now press the letter on your keyboard that you want to use to start the program. Make it easy to remember—for example, press I for Microsoft Internet Explorer. Note: You can use either uppercase or lowercase letters when creating your keyboard shortcuts—and when accessing them later. In the Shortcut key box, Microsoft Windows XP automatically adds Ctrl + Alt + before the key you pressed. When you want to start the program, hold down both the CTRL and ALT keys simultaneously, while also pressing the letter you chose. This way, your program won't start every time you type that letter.
|
3. | Click OK.
|
4. | Now test your shortcut. Hold down the CTRL and ALT keys, and then press the letter you chose. If you find it difficult to hold down two keys at once, read Turn on the Sticky Keys feature. Your program should start.
|


When your friends see you start up programs without touching your mouse, they just might think you have a psychic connection with your computer!
Navigate menus using the keyboard
You can speed up tasks in almost any program by choosing menu items using your keyboard instead of your mouse. This operation is particularly handy when you're performing repetitive tasks.
To control menus using your keyboard
1. | With your program open, press the ALT key. Notice that one letter on each menu name is now underlined. To open the menu, press the underlined key. For example, in Internet Explorer, the View menu name shows the V underlined after you press the ALT key. To open the View menu, press the ALT key, and then press V.
|
2. | Now, each menu item will show one letter underlined. To access or activate the menu item you want, simply press the underlined key. For example, in Internet Explorer, after you open the View menu, the Privacy Report menu item shows the V underlined. Instead of clicking Privacy Report with your mouse, you can just press the V key.
|
3. | You can also choose menu commands by pressing key sequences quickly, without waiting for the menus to open. For example, to quickly view a Web page's privacy report in Internet Explorer, press ALT, V, V. Similarly, to save a Web page in Internet Explorer, you would normally click the File menu, and then click Save As. To choose the same commands using your keyboard, press ALT, F, A. |


Control windows using your keyboard
If you like to keep four or five windows open while you work (or play) on your computer, you'll appreciate knowing these keyboard shortcuts. You can quickly switch between your Web browser, e-mail, instant message windows, and other programs without taking your hands off the keyboard.
| Action | Shortcut |
Minimize a window to your taskbar | ALT, SPACEBAR, N |
Maximize a window so it takes up your whole desktop | ALT, SPACEBAR, X |
Restore a window so it's visible but doesn't take up your whole desktop | ALT, SPACEBAR, R |
Close a window | ALT+F4 |
Switch to the last window you had open | ALT+TAB |
Switch to any window | Hold down the ALT key, and press TAB until the window you want is active |
Programs often start up in a "restored" state, where the window takes up only part of the screen. To maximize the window so that it takes up the entire screen, press the ALT key, press the SPACEBAR, and then press X. This will feel natural after you do it a few times, and you will feel much more efficient while using your computer.
Use a Web graphic for your desktop background
The Web has many beautiful pictures. If you find a picture you particularly like, such as the following image of the puppy, you can make it your desktop background, so that you can see it whenever you use your computer.
To use a Web graphic for your desktop background
1. | Use Microsoft Internet Explorer to open the Web page with the picture you like. |
2. | Right-click the picture, and then click Set as Background.
|

Microsoft Windows XP displays the picture as your desktop background. For best results, use large pictures that are wider than they are tall.
Instantly activate a screen saver
Screen savers were originally intended to prevent monitor burn-in, which could occur if a single image was displayed most of the time. Over time, that image would essentially become etched into the display, making the monitor harder to use. Monitor technology has improved over the years, and screen savers have become more a form of entertainment than a way to avoid burn-in.
Screen savers can be used to display your favorite photos or other images you'd like to see. Sometimes you might want to immediately start your screen saver like you would any other program, without waiting several minutes for it to start automatically.
To add a shortcut to your desktop that you can double-click to instantly start your screen saver
1. | Click the Start button, and then click Search.
|
2. | In the Search Results window, click All files and folders.
|
3. | In the All or part of the file name box, type *.scr. Then, click Search.
|
4. | You will see a list of screen savers in the search results. Pick the screen saver you want. You can preview it by double-clicking it. To add a shortcut to your desktop, right-click the file, click Send To, and then click Desktop.
|


Now you can instantly start your screen saver by double-clicking the icon on your desktop.
Schedule a weekly defragmentation
If it seems like your computer has gotten slower since you bought it, it probably has. One of the biggest factors that slows down your computer’s performance is fragmentation, a situation that occurs over time, in which files on your hard drive become divided into small pieces. Your computer must read a file to open, save, or close it. So when it reads each piece of a fragmented file separately, the effect is that the file can seem “slow” when you’re working with it.
Defragmenting your hard drive is the process of putting all the scattered pieces of files back together. Microsoft Windows XP includes a tool that will defragment your hard drive for you. To keep your system performing well, it’s a good idea to have Windows XP automatically defragment your hard drive every week.
To schedule a weekly defragmentation
1. | Click Start, and then click Control Panel.
|
2. | Click Performance and Maintenance.
|
3. | Under or pick a Control Panel icon, click Scheduled Tasks.
|
4. | In the Scheduled Tasks window, double-click Add Scheduled Task.
|
5. | In the Scheduled Task Wizard, click Next.
|
6. | Click Browse.
|
7. | In the File name box, type %systemroot%\system32\defrag.exe, and then click Open.
|
8. | Under Perform this task, click Weekly. Then, click Next.
|
9. | Set the time and day of the week you would like to defragment your hard drive. For best results, choose a time when your computer will be on but you will be away from it. Click Next.
|
10. | Type your password in both the Enter the password and Confirm password boxes. Then, click Next.
|
11. | Select the Open advanced properties for this task when I click Finish check box, and then click Finish.
|
12. | In the Run box, add C: to the existing command. Make sure you include a space before the “C:”. Then, click OK.
|
13. | In the Set Account Information dialog box, type your password in both the Password and Confirm password boxes. Then, click OK.
|


Windows XP will defragment your hard drive at the time you have scheduled. During defragmentation, a black window will open. If you happen to be working at your computer when the window opens, you can ignore it. The window will automatically disappear when defragmentation is complete. You can use other programs during defragmentation, but you may prefer to schedule defragmentation at a time when you won’t be using your computer.
Defragmentation works best when you have plenty of free space on your hard drive. For instructions on how to clear free space, read Maintenance tasks that improve performance.
Move your taskbar to a new spot
By default, the Microsoft Windows XP taskbar, which shows buttons for each of your open windows, sits at the bottom of your screen. That’s fine if you don’t open many windows. If you have more than six or seven windows open at a time, however, the taskbar can become extremely crowded. To make more room for windows, move your taskbar to the right or left side of the screen, where it will be displayed vertically, giving you room for more than a dozen windows.
Tip: If you have a widescreen monitor, placing your taskbar on the right or left side of the screen can make much more efficient use of screen space.
To move your taskbar
1. | Right-click your taskbar. If there is a check mark beside Lock the Taskbar on the shortcut menu, click Lock the Taskbar to unlock it.
|
2. | Drag your taskbar to the left, right, or top of your screen. To drag the taskbar, click and hold the mouse button over the taskbar. Then, while holding down the mouse button, drag the taskbar to its new location. When the taskbar is in place, release the mouse button. |
3. | Move the pointer over an edge of the taskbar until the pointer changes to a double-headed arrow. Click the mouse button, and drag the edge of the taskbar to widen it. When you can read the window titles, release the mouse button.
|
4. | Finally, to prevent your taskbar from being accidentally moved, right-click your taskbar, and click Lock the Taskbar on the shortcut menu.
|


